Podman remote client on MacOS using Vagrant
Installing Podman remote client on MacOS using vagrant

Table of Contents
Introduction
Podman is a daemonless, open-source, Linux native tool designed to make it easy to find, run, build, share and deploy applications using Open Containers Initiative (OCI) Containers and Container Images.
That been said, the core of podman only runs in Linux! To use podman on macOS, we need to implement the remote client to manage container using a Linux as a backend.
Brief Architecture
The remote client uses a client-server model. We need Podman installed on a Linux VM that also has the SSH daemon running. On our MacOS, when you execute a Podman command:
- Podman connects to the server via SSH.
- It then connects to the Podman service by using systemd socket activation.
- The Podman commands are executed on the Linux VM.
- From the client’s point of view, it seems like Podman runs locally.
Installation
Install podman on MacOS
To install podman remote client on MacOS, we use Homebrew
$ brew install podman
Create a new ssh-keys on MacOS
We will need to connect via ssh to our vagrant VM, in order to do it passwordless, we will create a ssh-key, the commands for that are:
$ ssh-keygen -t rsa -b 4096 -C "podman+vagrant"
Generating public/private rsa key pair.
Enter file in which to save the key (/Users/<USERNAME>/.ssh/id_rsa):
Enter passphrase (empty for no passphrase):
Enter same passphrase again:
Your identification has been saved in /Users/<USERNAME>/.ssh/id_rsa.
Your public key has been saved in /Users/<USERNAME>/.ssh/id_rsa.pub.
The key fingerprint is:
SHA256:+pGx7Wcn9WdfRYKJrcdMiKEIPKFRW1lQ1MXP/8i0PLA podman+vagrant
The key's randomart image is:
+---[RSA 4096]----+
|  ....=B+. ooo ..|
|   . ++. ..+oo.+ |
|    o  .. o +oo =|
|             .o+ |
|        S      ..|
|       . =  . . o|
|      . + .  B oo|
|       . o  E X o|
|        . .+.= o.|
+----[SHA256]-----+

cat /Users/<USERNAME>/.ssh/id_rsa.pub
ssh-rsa AAAAB3NzaC1y ... O3JH8w== podman+vagrant
Create a vagrant VM
We will use a Virtual Machine based on Fedora 33,
To create the specified Vagrantfile, we need to follow the next steps:
$ mkdir my-fedora && cd my-fedora

$ echo "Vagrant.configure("2") do |config|
  config.vm.box = "generic/fedora33"
  config.vm.hostname = "my-fedora"
  config.vm.provider "virtualbox" do |v|
    v.memory = 1024
    v.cpus = 1
  end
end" >> Vagrantfile
Implementation
At this moment we have:
- Podman installed
- A ssh-key with no password created
- A VM created with vagrant
Let’s start our implementation
Copy ssh-key from MacOS to Linux VM
We use the ssh-copy-id command, and it will ask us for the vagrant user password. The default one is: vagrant
$ ssh-copy-id -i id_rsa.pub [email protected] -p 2222

/usr/bin/ssh-copy-id: INFO: Source of key(s) to be installed: "id_rsa.pub"
/usr/bin/ssh-copy-id: INFO: attempting to log in with the new key(s), to filter out any that are already installed
/usr/bin/ssh-copy-id: INFO: 1 key(s) remain to be installed -- if you are prompted now it is to install the new keys
[email protected]'s password:

Number of key(s) added:        1

Now try logging into the machine, with:   "ssh -p '2222' '[email protected]'"
and check to make sure that only the key(s) you wanted were added.
You can verify connectivity with the command:
$ ssh [email protected] -p 2222
Last login: Tue Feb 23 07:33:45 2021 from 10.0.2.5
[vagrant@my-fedora ~]$
Configure the Linux VM
On this step we will:
- Install the podman package and dependencies
- Enable the podman service
- Enable the sshd service
Installing podman
sudo dnf --enablerepo=updates-testing install podman libvarlink-util libvarlink
Enableling the podman service
We can enable and start the service permanently, using the following commands:
$ systemctl --user enable --now podman
Also, we will need to enable linger for this user in order for the socket to work when the user is not logged in.
sudo loginctl enable-linger $USER
You can verify that the socket is listening with a simple Podman command.
$ podman --remote info
Enableling the sshd service
In order for the client to communicate with the server you need to enable and start the SSH daemon on the Linux VM:
$ sudo systemctl enable --now sshd
Using the client
The first step in using the Podman remote client is to configure a connection. To do that, we need can add a connection by using the podman system connection add command.
$ podman system connection add <CONNECTION-NAME> ssh://[email protected]:2222 --identity <SSH-KEY>
$ podman system connection add my-fedora ssh://[email protected]:2222 --identity ~/.ssh/id_rsa.pub
We can verify that the connection is in place with the command:
$ podman system connection list
Name       Identity                                                  URI
my-fedora*  ~/.ssh/id_rsa.pub  ssh://[email protected]:2222/run/user/1000/podman/podman.sock
Now we can test the connection with the command:
$ podman info
host:
  arch: amd64
  buildahVersion: 1.18.0
  cgroupManager: systemd
  cgroupVersion: v2
  conmon:
    package: conmon-2.0.21-3.fc33.x86_64
    path: /usr/bin/conmon
    version: 'conmon version 2.0.21, commit: 0f53fb68333bdead5fe4dc5175703e22cf9882ab'
  cpus: 1
  distribution:
    distribution: fedora
    version: "33"
  eventLogger: journald
  hostname: my-fedora
  ...
Also, you can start running podman commands as you run them in docker:
$ podman images
REPOSITORY  TAG     IMAGE ID      CREATED        SIZE
Next steps
At this point we have installed everything that we need to start using podman on our MacOS, but podman only work if the Linux VM is up & running, otherwise you will receive an error similar to this:
$ podman images
Error: Cannot connect to the Podman socket, make sure there is a Podman REST API service running.: failed to create sshClient:
Connection to bastion host (ssh://[email protected]:2222/run/user/1000/podman/podman.sock) failed.: dial tcp 127.0.0.1:2222: connect: connection refused
To avoid that behavior, what I implement is an automator workflow, here are the steps:
Get the vagrant VM id, to do that run:
$ vagrant global-status
id       name    provider   state    directory
--------------------------------------------------------------------------
894d683  my-fedora virtualbox running ~/vms/my-fedora

The above shows information about all known Vagrant environments
on this machine. This data is cached and may not be completely
up-to-date (use "vagrant global-status --prune" to prune invalid
entries). To interact with any of the machines, you can go to that
directory and run Vagrant, or you can use the ID directly with
Vagrant commands from any directory. For example:
"vagrant destroy 1a2b3c4d"
As you can see we are interested on get the id column, for this example: 894d683
Now, we need to open Automator, go to Launchpad -> search -> type automator, do click on the Automator Application
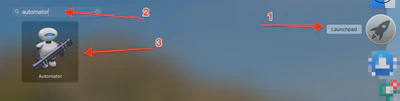
Launchpad + Automator Then, we need to write an automator application, for this example I choose a workflow that it will run the command
vagrant up <VM-ID>$ vagrant up 894d683 Bringing machine 'my-fedora' up with 'virtualbox' provider... ==> default: Checking if box 'generic/fedora33' version '3.2.0' is up to date... ==> default: A newer version of the box 'generic/fedora33' for provider 'virtualbox' is ==> default: available! You currently have version '3.2.0'. The latest is version ==> default: '3.2.6'. Run `vagrant box update` to update. ==> default: Clearing any previously set forwarded ports... ==> default: Clearing any previously set network interfaces... ==> default: Preparing network interfaces based on configuration... default: Adapter 1: nat ==> default: Forwarding ports... default: 22 (guest) => 2222 (host) (adapter 1) ==> default: Running 'pre-boot' VM customizations... ==> default: Booting VM... ==> default: Waiting for machine to boot. This may take a few minutes... default: SSH address: 127.0.0.1:2222 default: SSH username: vagrant default: SSH auth method: private key ==> default: Machine booted and ready! ==> default: Checking for guest additions in VM... ==> default: Setting hostname... ==> default: Machine already provisioned. Run `vagrant provision` or use the `--provision` ==> default: flag to force provisioning. Provisioners marked to run always will still run.
Automator Workflow Save the Workflow and remember the location where you save it.
The final step is to add the workflow to our login items. Go to
Systems Preferences -> Users & Groups -> Login Itemsand add the application that you save on the previous step.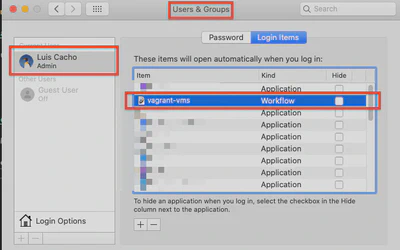
Login Items Menu And that is all, you will have a fully working podman command on your MacOS.
References:
Luis Cacho
Senior Container Infrastructure Consultant
Senior Container Infrastructure Consultant at Red Hat | DevOps Practitioner | Kubernetes Enthusiast | Ansible Ninja | Data Science Noob