Set a hugo blog on Kubernetes
Here are some steps to containerize a blog using hugo + docker + kubernetes + quay
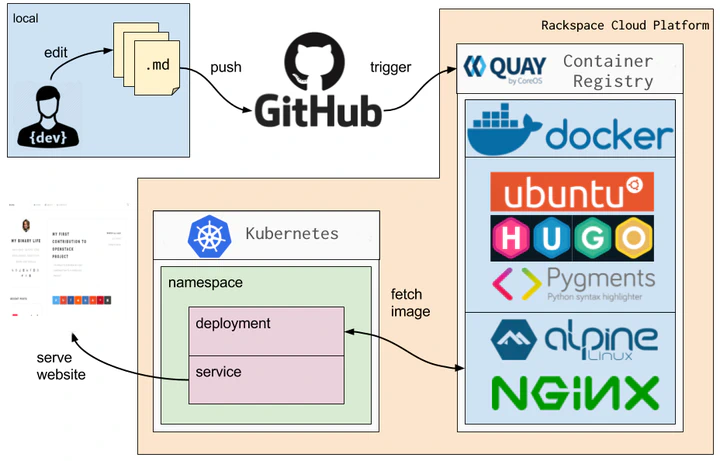
Table of Contents
Overview
Since last year I been trying to become an SRE (Site Reliability Engineer), so I been involved with some emerging technologies, like ansible, docker and on this time with kubernetes.
This time, I will try to explain how I containerized my blog using:
Architecture
So, I take some ideas from here and I modify them and adapt the architecture described to my options.
The principal changes that I made are:
- My Kubernetes cluster is running on 2 cloud server on Rackspace Public Cloud
- The container registry that I’m using is Quay
- Rackspace Public Cloud does not support a Kubernetes LoadBalancer service automatically, so I simulate that behavior adding a Cloud Load Balancer manually after the Kubernetes service provide me the port.
Containerized
I use Hugo to deploy my blog, I used to do it as mentioned on this previous post (In Spanish).
Now, as a part of containerize the blog it make sense to me to create two stages as described here:
- The first stage is a defined build environment containing all required build tools (hugo, pygments) and the source of the website (Git repository).
- The second stage is the build artifact (HTML and assets), from the first stage and a webserver to serve the artifact over HTTP.
Dockerfile
Here is the Dockerfile that containerize the blog:
FROM ubuntu:latest as STAGEONE

# install hugo
ENV HUGO_VERSION=0.41
ADD https://github.com/gohugoio/hugo/releases/download/v${HUGO_VERSION}/hugo_${HUGO_VERSION}_Linux-64bit.tar.gz /tmp/
RUN tar -xf /tmp/hugo_${HUGO_VERSION}_Linux-64bit.tar.gz -C /usr/local/bin/

# install syntax highlighting
RUN apt-get update
RUN apt-get install -y python3-pygments

# build site
COPY source /source
RUN hugo --source=/source/ --destination=/public/

FROM nginx:stable-alpine
RUN apk --update add curl bash
RUN rm /etc/nginx/conf.d/default.conf
COPY modules/nginx.luiscachog.io.conf /etc/nginx/conf.d/luiscachog.io.conf
COPY --from=STAGEONE /public/ /usr/share/nginx/html/
EXPOSE 80 443

MAINTAINER Luis Cacho <[email protected]>
First Stage
- Fetch the lastest Ubuntu image and name as STAGEONE
- Install the last available hugo version from source.
- Install pygments library to use it for highlighting.
- Build the site with hugo and the output is set on /public as a build artifact.
Second Stage
- Fetch the lastest stable nginx alpine image.
- Update the image and install some utilities.
- Delete the default nginx configuration file.
- Copy the configuration files needed from the repository root directory.
- Copy the build artifact /public from the previous stage (STAGEONE)
Luis Cacho
Senior Container Infrastructure Consultant
Senior Container Infrastructure Consultant at Red Hat | DevOps Practitioner | Kubernetes Enthusiast | Ansible Ninja | Data Science Noob